Saturday, December 21, 2013

Desktop Motherboard Replace: Part-3

It is the most important screenshot that now all latest motherboard require more power then you need to connect ATX Main Power Connector on the motherboard. Please, follow Action-14.
Motherboard Replace: Action-14
RAM and Processor,Desktop Motherboard Replace,Dual Colored Power LED,Hard Drive Active LED,Motherboard Replace,Power Switch, Reset Switch,screenshot of Desktop Motherboard,Single Colored Power LED,Laptop Motherboard replacement,Hardware replace

If you have video adopter then please follow to set the video card on the motherboard. Please follow Action-15 and Action-16.
Motherboard Replace: Action-15
RAM and Processor,Desktop Motherboard Replace,Dual Colored Power LED,Hard Drive Active LED,Motherboard Replace,Power Switch, Reset Switch,screenshot of Desktop Motherboard,Single Colored Power LED,Laptop Motherboard replacement,Hardware replace

Motherboard Replace: Action-16
RAM and Processor,Desktop Motherboard Replace,Dual Colored Power LED,Hard Drive Active LED,Motherboard Replace,Power Switch, Reset Switch,screenshot of Desktop Motherboard,Single Colored Power LED,Laptop Motherboard replacement,Hardware replace

Desktop Motherboard Replace: Part-2

Motherboard Replace: Action-8

This screenshot is also very needed to set USB port of front side of casing. Please, follow Action-9 and Action-10.
Motherboard Replace: Action-9

Motherboard Replace: Action-10

It is SATA cable setting's screenshot. Latest motherboards  are SATA  supported. So, you should be setup all SATA port's accessories, like Hard Disk and Optical Drives.
Motherboard Replace: Action-11

It is IDE cable setting's screenshot. If you need to set IDE cable setup then you can follow this picture.
Motherboard Replace: Action-12

It is most important screenshot. Because, electricity is most part of an electrical device. No electrical devices are run without electricity. So, we need to set the power supplier's main AC cable on the motherboard. So, please, set the power supplier's main cable, which is capable to set on the motherboard. You can get help Action-13 screenshot.
Motherboard Replace: Action-13

Desktop Motherboard Replace: Part-1

A computer is made by more components or more parts. From those parts, motherboard is main parts. In a short word, we can't think a computer without motherboard. All accessories are set on motherboard, like Processor, RAM, AGP card, Sound Card, Mouse-Keyboard etc. However, now Motherboard Replacement is narrated in below.

At first, choose a branded motherboard from market. And after set the motherboard into desktop casing. It is simple. At first, follow like this Screenshot. The steel plat is Casing Back Panel. It is gotten with new motherboard. However, set this Casing Back Panel in the back side of casing strongly.  

Motherboard Replace: Action-1

To do or to complete this replacement is needed a screw driver or Nut driver. Please, check all screws and corresponding standoffs of casing, like this screenshot. You have to verify all standoffs are installed properly.
Motherboard Replace: Action-2

Now, take the motherboard from the packet and boundless to the motherboard very carefully. It is essential speech that you have to set RAM and Processor before installed into casing. Please, install RAM and Processor very carefully on the motherboard. If the installing would be finished then whole motherboard installed to the desktop casing very carefully.  

You have to verify all standoffs are installed properly. Please follow picture:Action-3,Action-4 and Action-5.
Motherboard Replace: Action-3
Motherboard Replace,Desktop Motherboard Replace,screenshot of Desktop Motherboard,Hard Drive Active LED,Single Colored Power LED,Dual Colored Power LED,Power Switch,Reset Switch

Motherboard Replace: Action-4
Motherboard Replace,Desktop Motherboard Replace,screenshot of Desktop Motherboard,Hard Drive Active LED,Single Colored Power LED,Dual Colored Power LED,Power Switch,Reset Switch

Motherboard Replace: Action-5
Motherboard Replace,Desktop Motherboard Replace,screenshot of Desktop Motherboard,Hard Drive Active LED,Single Colored Power LED,Dual Colored Power LED,Power Switch,Reset Switch

Now, you should to set the motherboard and all screws are needed to tie by screw driver. You can get help by Action-6 picture.
Motherboard Replace: Action-6
Motherboard Replace,Desktop Motherboard Replace,screenshot of Desktop Motherboard,Hard Drive Active LED,Single Colored Power LED,Dual Colored Power LED,Power Switch,Reset Switch

This screenshot is very needed to set all switch in front of casing. If keep your eye deeply to the motherboard then you face a cable panel to set Reset Button and Start Button,  that means the panel has Hard Drive Active LED,Single Colored Power LED,Dual Colored Power LED,Power Switch,Reset Switch. Please set all switch very sincerely.
Please, follow Action-7 and Action-8.
Motherboard Replace: Action-7

Motherboard Replace: Part-1

Motherboard Replace: Part-2

Motherboard Replace: Part-3

Thursday, December 12, 2013

Increase Pan Drive’s data transfer speed

Increase Pan Drive’s data transfer speed
Insert a Pan Drive in your PC. Just pew minuets wait to install the Pan Drive. If the installment would be finished, then you have to go with your mouse to “My Computer” option. And go My Computer’s Properties. And then select “Hardware” to go “Device Manager”. Then, from Ports (Com & LPT), double click on Communications Port (COM1). 

From the Port Settings, set Bit Per Seconds into 128000. And apply the Hardware setting from Follow Control to click “OK” button to back in Desktop.

At last, feel the copy-past speed is very first than before of Hardware Setting.

Thank you to visit this blog.

Tuesday, December 10, 2013

How do you setup Windows-7 ?


BIOS setting, First Boot by CD/DVD, CD/DVD option, press F10, DVD writer, insert a DVD into the DVD writer, massage, a massage, keyboard, boot Windows, boot Windows from CD/DVD, press any key, continue the setup of Windows 7, Windows7 setup, fundamental knowledge on Computer Hardware, fundamental knowledge, knowledge on Computer Hardware, installing of Windows7, installing of Windows7 with screen shot, PC or Laptop or Computer, fundamental Computer Hardware knowledgeInfect, it is a conditional question for all user of computer. It is hardware related conception. So, if you want to setup any Windows to your PC or Laptop or Computer, then you have to gain fundamental knowledge on Computer Hardware. However, I am sharing the installing of Windows7 with screen shot.
At first, BIOS setting. From the BIOS setting, select as First Boot by CD/DVD option and then save to press F10. And then, insert a DVD into the DVD writer. Please, restart your PC. And a massage you would be faced from your PC on the booting screen. Please, press any key from your keyboard, when shown “To boot Windows from CD/DVD press any key” massage. You have to press any key from your keyboard.
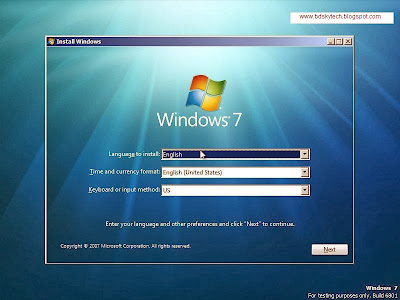
When start the booting from the DVD… I add a to z screen shots of installing Windows-7. Please follow and continue the setup of Windows 7.


It is first screen shot of Windows7 installing
BIOS setting, First Boot by CD/DVD, CD/DVD option, press F10, DVD writer, insert a DVD into the DVD writer, massage, a massage, keyboard, boot Windows, boot Windows from CD/DVD, press any key, continue the setup of Windows 7, Windows7 setup, fundamental knowledge on Computer Hardware, fundamental knowledge, knowledge on Computer Hardware, installing of Windows7, installing of Windows7 with screen shot, PC or Laptop or Computer, fundamental Computer Hardware knowledge


BIOS setting, First Boot by CD/DVD, CD/DVD option, press F10, DVD writer, insert a DVD into the DVD writer, massage, a massage, keyboard, boot Windows, boot Windows from CD/DVD, press any key, continue the setup of Windows 7, Windows7 setup, fundamental knowledge on Computer Hardware, fundamental knowledge, knowledge on Computer Hardware, installing of Windows7, installing of Windows7 with screen shot, PC or Laptop or Computer, fundamental Computer Hardware knowledge


BIOS setting, First Boot by CD/DVD, CD/DVD option, press F10, DVD writer, insert a DVD into the DVD writer, massage, a massage, keyboard, boot Windows, boot Windows from CD/DVD, press any key, continue the setup of Windows 7, Windows7 setup, fundamental knowledge on Computer Hardware, fundamental knowledge, knowledge on Computer Hardware, installing of Windows7, installing of Windows7 with screen shot, PC or Laptop or Computer, fundamental Computer Hardware knowledge
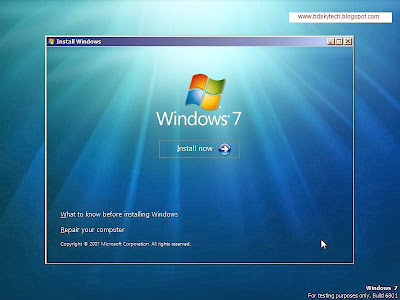
Above those screen shots are first booting continuity.

BIOS setting, First Boot by CD/DVD, CD/DVD option, press F10, DVD writer, insert a DVD into the DVD writer, massage, a massage, keyboard, boot Windows, boot Windows from CD/DVD, press any key, continue the setup of Windows 7, Windows7 setup, fundamental knowledge on Computer Hardware, fundamental knowledge, knowledge on Computer Hardware, installing of Windows7, installing of Windows7 with screen shot, PC or Laptop or Computer, fundamental Computer Hardware knowledge
Please, select your language.But default is better. 


BIOS setting, First Boot by CD/DVD, CD/DVD option, press F10, DVD writer, insert a DVD into the DVD writer, massage, a massage, keyboard, boot Windows, boot Windows from CD/DVD, press any key, continue the setup of Windows 7, Windows7 setup, fundamental knowledge on Computer Hardware, fundamental knowledge, knowledge on Computer Hardware, installing of Windows7, installing of Windows7 with screen shot, PC or Laptop or Computer, fundamental Computer Hardware knowledge
 Click by mouse on "Install Now" button.

BIOS setting, First Boot by CD/DVD, CD/DVD option, press F10, DVD writer, insert a DVD into the DVD writer, massage, a massage, keyboard, boot Windows, boot Windows from CD/DVD, press any key, continue the setup of Windows 7, Windows7 setup, fundamental knowledge on Computer Hardware, fundamental knowledge, knowledge on Computer Hardware, installing of Windows7, installing of Windows7 with screen shot, PC or Laptop or Computer, fundamental Computer Hardware knowledge


BIOS setting, First Boot by CD/DVD, CD/DVD option, press F10, DVD writer, insert a DVD into the DVD writer, massage, a massage, keyboard, boot Windows, boot Windows from CD/DVD, press any key, continue the setup of Windows 7, Windows7 setup, fundamental knowledge on Computer Hardware, fundamental knowledge, knowledge on Computer Hardware, installing of Windows7, installing of Windows7 with screen shot, PC or Laptop or Computer, fundamental Computer Hardware knowledge
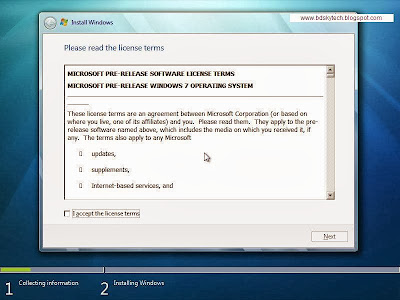
Check to the "check box" and give your agreement.

BIOS setting, First Boot by CD/DVD, CD/DVD option, press F10, DVD writer, insert a DVD into the DVD writer, massage, a massage, keyboard, boot Windows, boot Windows from CD/DVD, press any key, continue the setup of Windows 7, Windows7 setup, fundamental knowledge on Computer Hardware, fundamental knowledge, knowledge on Computer Hardware, installing of Windows7, installing of Windows7 with screen shot, PC or Laptop or Computer, fundamental Computer Hardware knowledge
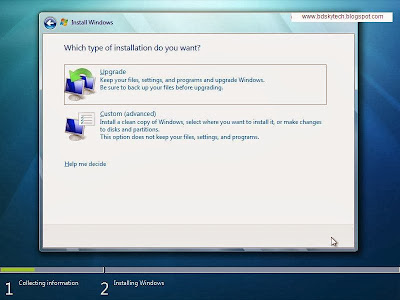
Select and click on the "Custom(Advanced)" option.

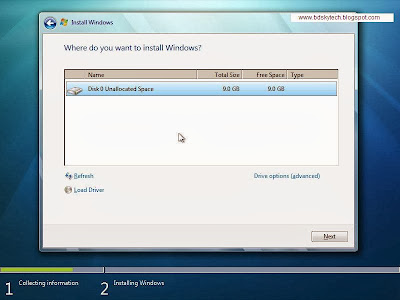
 Again, select "Drive option(Advanced)" option to see or show all drives of PC or Desktop or Laptop.

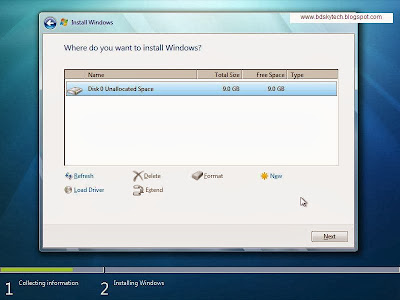
 It is very important screen shot. This option contained with drive deleting,drive formatting and drive creating. In the option, "NEW" means hard drive partitioning. It is simple like Windows XP's partition creating. But you can not create partition more than three drives.However, if you want to see deeply, then you can do everything from this option.
Lets go next option...


BIOS setting, First Boot by CD/DVD, CD/DVD option, press F10, DVD writer, insert a DVD into the DVD writer, massage, a massage, keyboard, boot Windows, boot Windows from CD/DVD, press any key, continue the setup of Windows 7, Windows7 setup, fundamental knowledge on Computer Hardware, fundamental knowledge, knowledge on Computer Hardware, installing of Windows7, installing of Windows7 with screen shot, PC or Laptop or Computer, fundamental Computer Hardware knowledge
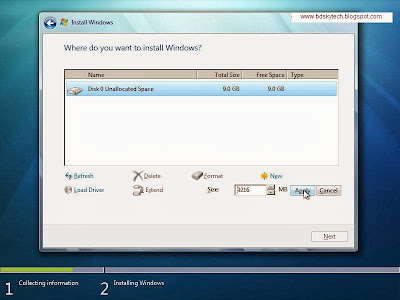
Please, create a drive like this option.When would be finished the drive creating, then select "NEXT' button. And the installing would be run, like down's screen shot.

BIOS setting, First Boot by CD/DVD, CD/DVD option, press F10, DVD writer, insert a DVD into the DVD writer, massage, a massage, keyboard, boot Windows, boot Windows from CD/DVD, press any key, continue the setup of Windows 7, Windows7 setup, fundamental knowledge on Computer Hardware, fundamental knowledge, knowledge on Computer Hardware, installing of Windows7, installing of Windows7 with screen shot, PC or Laptop or Computer, fundamental Computer Hardware knowledge

Completely, you need to finish the installing of Windows 7 only 20 minuets to 25 minuets. Wait for the time and celebrate Windows 7's test.

More Hardware related link ...